Tips for creating and consuming NuGet packages locally
There's so many reasons why NuGet can be a pain to work with sometimes. I just want to give some neat tips to make it easier to develop them (and consume) locally during development.


Overview
There's so many reasons why NuGet can be a pain to work with sometimes. I won't go into details here. I just want to give some neat tips to make it easier to develop them (and consume) locally during development. These tips can actually make you way more productive, compared to if you're using none of them. So it's worth to scan through them at least.
Although i'm using MacOS, everything I mention below is applicable to Windows too. You might just want to replace Make with another scripting tool.
I'll explain how to;
- Clear the NuGet caches
- Clear built project files (bin/obj files)
- Versioning locally
- Define your local feed
- Using Make to easy publish locally
Clear NuGet caches
Any time when you restore packages (through dotnet build or dotnet restore, for example), NuGet will cache packages on your computer in some specific folders. Why would NuGet cache packages you might ask? It's quite obvious if you think about it - it just wouldn't make sense if every developer worldwide would query nuget.org (or their organization feed) every single time they did a dotnet restore. So NuGet caches packages locally to speed up development and reduce traffic to nuget.org. You can list all these package caches on your computer by running dotnet nuget locals all --list, as shown below:

Fortunately there's a simple way to clear these caches. Just open a terminal and run dotnet nuget locals all --clear. Below is what it looks like. After running this command the next restore will go online to fetch the packages. This is really really good.

Clear built project files (bin/obj files)
Seems a lot of developers are still unaware of .NET Core Tools.
A .NET Core tool is a special NuGet package that contains a console application
In .NET Core 3.1 the so-called .NET Core Tools have been improved. .NET Core Tools is essentially a way to share utility-like console applications, much like npm install -g <things>. There's a tool that I personally love, and that's cleanup.
Install cleanup as a global tool by running:
dotnet tool install -g dotnet-cleanup
(-g will make it global on your computer, so that you can run it from within any folder)
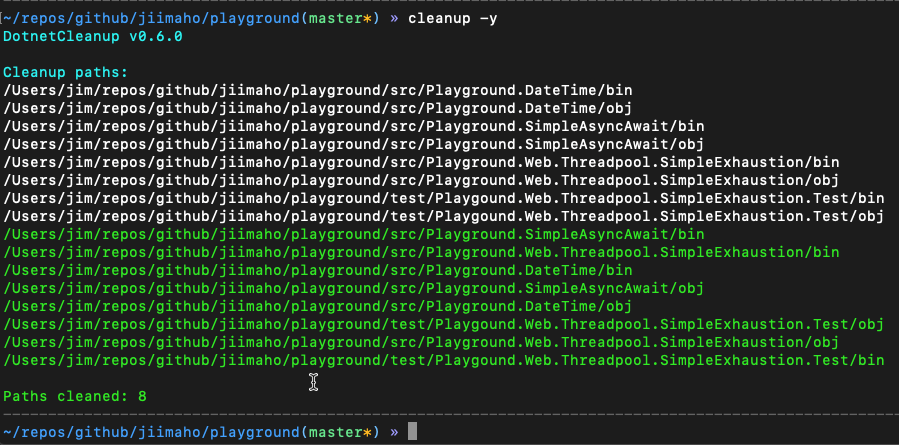
After the install is done, you can navigate to your favorite project, and type cleanup -y (-y means it won't ask you to confirm. The tool will recursively traverse all folders and wipe all the obj and bin folders). Fantastic! Below is what running that command looks like:
The good thing with this tool is that it works cross-platform. So even if you already have a colleague that have written a bash, PowerShell, python or w/e script, this tool is already available and your whole team can use it.
Here's a list of some other tools you can try if you like.
Versioning locally
I'll assume you're using semver, because it's such a good way to version things.
Given a version number MAJOR.MINOR.PATCH, increment the:
1. MAJOR version when you make incompatible API changes,
2. MINOR version when you add functionality in a backwards compatible manner, and
3. PATCH version when you make backwards compatible bug fixes.
Additional labels for pre-release and build metadata are available as extensions to the MAJOR.MINOR.PATCH format.
So let's assume you have a package version 2.3.1.
Now you've added new features in a backwards-compatible manner, so that makes the next version 2.4.0.
If you add the functionality and publish it locally as 2.4.0 then you'll run into problems when you realize it doesn't work, and you need to iterate a couple more times to eventually have a stable 2.4.0 version. This is a pain, because 2.4.0 is already stored in your package cache, so if you re-publish it locally as 2.4.0 the consuming code might not really get the new changes.
Instead I use the following approach: Set the version to be the final one, such as 2.4.0, but also append your name and a number, such as 2.4.0-jim1. Publish and test locally. The code doesn't work? Fix it and publish again as 2.4.0-jim2. This way it will be easier to consume the package with more confidence that you're running the correct code.
Define your local feed
One thing that is far from obvious when you start working with NuGet is that a simple folder on your file system can be used as a NuGet feed. Yep you read that right.
So define a local folder, for example /Users/jim/localfeed and publish your packages in that folder. Then add this NuGet feed (folder) as a source in your nuget.config file as usual, by adding a new entry <add key="localfeed" value="/Users/jim/localfeed" />.
I also suggest you add this <add key="localfeed" value="/Users/jim/localfeed" /> entry in your nuget.config for the current user at least, so that you don't have to add the feed for each repository you might be working on. I've added my entry at ~/.config/NuGet/NuGet.config. Now /Users/jim/localfeed will be searched too, instead of just nuget.org, for example. So when you publish your 2.4.0-jim1 version and copy it into /Users/jim/localfeed, it can be found by all your projects.
Using Make to easy publish locally
One final thing to do (yet very pleasant!) is to make the publish mechanism slightly more efficient. Essentially we want to make it as easy as possible to make a code change and re-publish the "new" version and consume it again. And again and again. Short feedback cycle.
I'm using Make for this, since it's installed by default on MacOS/Linux and has a super-simple syntax and does the job. So go ahead and for each repository (or project) you want to publish your nuget for, create a file named Makefile with the below content.
Now you can open up a terminal and go to the directory where your project is, and type make mac. This will publish the package into your local feed ready to be consumed! You can include a windows "version" too if you want, like i've done. It will require your colleagues to install Make, so that's up to them what they prefer.
Summary
All tools together mentioned in this post helps me a lot in my daily work with creating and consuming NuGet packages. You can use some of them, none of them, or all of them. It's about what makes your development cycle the shortest.
- Use
cleanup -yto delete built files in your project make macto build NuGets to your local feeddotnet nuget locals all --clearto clear your local NuGet caches- Using semver and suffixing with your name and a number to not fall into the trap of using the right version but wrong code
Hope you found it helpful! Feel free to leave a comment below if you have any other tip that can benefit someone else reading this.